What Stacking Methods Are Used for Trays? 4 Stacking Methods for Efficient Palletizing
This article demonstrates which stacking methods are used for different applications, where common errors occur, and which stacking method provides the greatest added value.

Moritz Bittner
4. Juni 2025
Contents
Palletising: How to avoid transport damage with the right stacking method
If plastic trays and workpiece carriers can be stacked, this has advantages for production, storage and logistics. In production, your products are loaded into trays from conveyor belts until the assembled stacks are transported onwards. Free-standing tray stacks do not require any additional boxes or containers as loading aids. Stacking trays save space when storing your products. In intralogistics, a stable stacking method ensures safe transport.
A few key facts about tray stacking methods
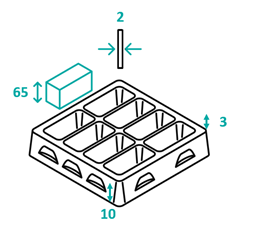
If trays are to be stacked, this must be taken into account in the design, as additional space is required for stacking. A stackable tray is therefore usually slightly higher than non-stackable models. The tray height when loaded is then made up as follows, for example:
Height of the components: 65 mm
Stacking height: 10 mm
Space to the next higher tray: 3 mm
Material thickness of the tray (wall thickness): 2 mm
Tray height (loaded): = 80 mm
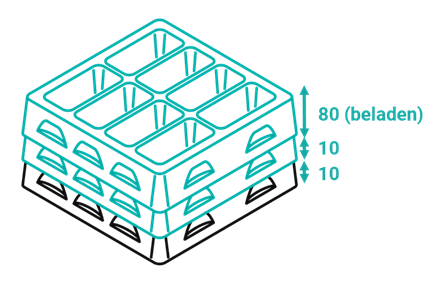
The total stacking height of this example results from the calculated tray height of 80 mm (loaded) and the stacking height of 10 mm per tray added with each tray. If certain outer carton dimensions are specified, it is possible to calculate how many trays fit into a packaging unit.
In the formary configurator, you can either adapt the tray to a specific carton or directly request a suitable carton for the specified stacking height.
Which stacking method is the right one for efficient palletising?
When selecting the right stacking method for palletising, various points are decisive:
Material thickness
The required stacking of the tray depends primarily on the material thickness used. The stacking method often depends on whether the tray is used as a disposable or reusable product.
Sensitivity of the products
Can the next higher tray stack touch your components or rest on them, or are they touch-sensitive? If you are not allowed to stack over the components, but must leave a few millimetres of clearance to the next higher tray, then the stacking tray must be designed to be self-supporting - this requires robust palletising.
Urgency of the schedule
Simple stacking techniques, such as undercut stacking, are easier to implement than moving mould parts (a nap stacking) - and therefore shorten the lead time of your first samples.
These points determine the pallet stacking method to be used.
What exactly is an undercut? And what is it used for when palletising stacking trays?
The most commonly used stacking method in logistics is undercut stacking.
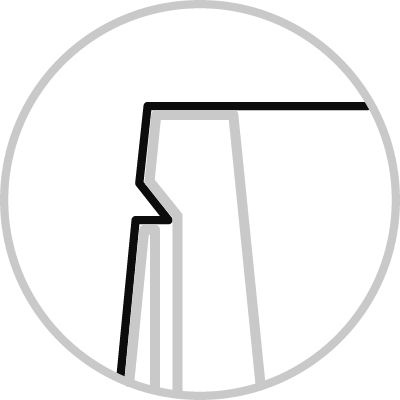
An undercut is an inward-facing flange in the tray wall. These are not easy to mould during production, as they have to be removed from the thermoforming tool in the opposite direction to the demoulding direction.
However, undercuts offer considerable advantages when using plastic trays - for example, they enable cost-efficient stacking.
The size of undercuts can be varied. For small loads such as small cups, an undercut can be very narrow. However, if large loads have to be carried, for example heavy metal parts or engine components, more support surface is required so that the weight is evenly distributed over the material of the underlying tray. In this case, the undercuts are designed to be as wide and deep as possible.
The price-performance ratio of stacking methods
So which techniques are available and which should be used to avoid transport damage? That depends. We provide guide values based on your application or product. What you are primarily interested in when purchasing a tray is often the price - or the price-performance ratio. More complex technologies often have higher tool prices. We explain the background.
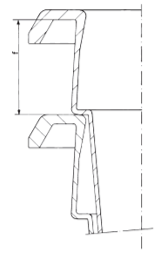
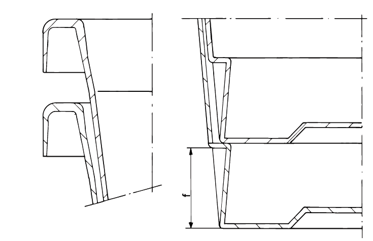
1. Stacking method for small buckets, tubs, tubs: Undercut stacking at the edge
With smaller buckets and tubs, the undercut stacking does not need to be very pronounced due to the low weight. It can therefore be applied directly to the edge. This type of palletising is therefore particularly suitable for containers. Simple undercut stacking can be incorporated into the mould during design and is not cost-intensive.
Top undercut:
Undercut bottom:
2. Stacking method for disposable trays and workpiece carriers with thin material: undercut stacking in the wall
We have already discussed what undercuts are. As products with a low weight only require a narrow stack, this can be incorporated into the mould without additional features (more on this later). This allows for low-cost moulds and fast production cycles. Just right for disposable trays.
The disadvantage, however, is that undercut stacking can naturally reach its limits with thin material. If the load is too heavy and the stacking does not support it, the undercut must either be maximised or the material thickness increased. If this does not help either, dimple stacking must be used (see point 4.).
Normal undercut stacking is usually used for transport and storage applications:
- Small trays
- Workpiece carriers with low packing density
- Workpiece carriers with low weight
- Low initial thicknesses
- Disposable trays
- Lowest possible project costs
3. Stacking method for inlays and inserts: A/B stacking
With A/B stacking, two different versions, A and B, of the tray are produced. The two tray versions are identical, but have offset stacking lugs. When palletising, an A part is always placed on a B part so that the nubs are always positioned at offset points on the tray and stabilise the parts.
Theoretically, this would require two different thermoforming moulds. However, it is also possible to simply use a multi-slot mould with 50% A and 50% B stacking trays. Alternatively, movable modules can be fitted in a single-use mould, which are changed after half the number of pieces. This effort has a corresponding effect on the price of A/B stacking.
A/B stacking is often used for empty packaging during palletising. This means when empty packaging is sent to a packaging line for packing. The trays are very easy to separate, are all aligned in the same way and can be processed quickly from the stack. The usual area of application for A/B stacking is therefore the inlay.
4. Stacking method for automation trays: Dimple stacking from a flap mould
If the stacking has to be very stable, dimple stacking is used for palletising. The stacking trays are supported and stacked by circumferential block segments. If trays contain heavy parts or if precise stacking tolerances of the vertical stack are required (e.g. in a palletiser of an automation system), this is the right technology.
The circumferential stacking cams are so strongly moulded that they could not be demoulded with a normal tool. For this reason, horizontal flaps are used around the edge of the mould during production to form the block segments. Before demoulding, these segments fold to the side so that the tray can be demoulded seamlessly. This technique requires a more complex mould design. A so-called flap mould with moving parts is used.
For this reason, this stacking method tends to be in the premium range, with a more cost-intensive tool setup and longer tool production times. For this reason, flap tool stacking is usually used in higher-value application areas such as automation , where robot palletising comes into play in addition to manual palletising.
These typical mistakes are often made when palletising
For stacking to fulfil its purpose, a number of points have to fit together. Are you having problems stacking your trays? We discuss the error patterns and their possible causes:
The aim is to prevent jammed and wedged stacks and to achieve the most stable result possible.
Conclusion: The right stacking method helps to avoid transport damage
The correct stacking method helps to prevent transport damage by distributing the weight evenly and contributing to the stability of the load. Different techniques such as undercut stacking and dimple stacking contribute significantly to product safety. The choice of the right palletising technology should be tailored to the specific requirements in order to optimise costs and minimise damage.
Would you like to benefit from this? Simply tell us the stacking height or the number of trays to be stacked in your enquiry. If you already have 3D data for your tray, you can also use our 3D tray generator to test which stacking method is best suited to your plastic tray.
Still have questions about tray stacking methods? Write to us in the live chat or give us a call!